Tuesday, July 21, 2020

HTML - Jumping to another part of the page


Sometimes with a long page, it is helpful to provide a quick way for the user to jump down to a particular place.

In our virtual travel blog, we have a post that presents three different trails:


Clicking on one of these selections will take the reader down the page to that particular trail. 

In Blogger HTML mode you enter the following code to allow a jump to any of these three points:

 
The second line jumps to Yosemite Falls Trail and at this point we add a name tag, using the name "falls".  Since the link is not to another page we provide a null page link with the name "falls" attached:

These code examples are available in a text file so that they can be copied, pasted and modified as required:

Sunday, June 14, 2020

HTML - Hypertext Mark-up Language

When building a blog using Blogger, you have two modes: Compose or HTML

Compose is where you add text, images and video and can see what will be displayed. 

HTML mode is a behind the scenes look at the code behind your blog post, which is written in HTML or Hypertext Mark-up Language. 

It is useful to understand the basics of the HTML language which are quite simple and easy to understand. A good, free and interactive tutorial is provided by W3Schools.com: 


Examples of when the HTML mode is useful

In the above link to the W3Schools.com tutorial we added a screen capture image of the tutorial home page, and we made this clickable by changing the A HREF tag in the image to the tutorial web address: 
<a href="https://websterblogs.blogspot.com/2020/06/blgo-home.html">

By default the A HREF tag for an image just lets you access that image in a separate window.

We look at the use of HTML tables in the blog post:  
 

We look at setting up clickable images in:


Wednesday, June 10, 2020

Index of Past Posts


This is a blog about blogging and the various techniques employed:

 
HTML - Jumping to another part of the page
 
Setting Up a Heading Banner and Link to Index of Past Posts 

HTML - Hypertext Mark-up Language  

 Blog Home - Using Tables in a Blog Post  

Image Maps - Making Clickable Images

Setting Up a Heading Banner and Link to Index of Past Posts


This the procedure for setting up an image banner header for a blog with a link to the Index of Past Posts.  I always prefer to set up a proper Index of Past Posts post that provides links to all the past posts along with further blog information.  Blogger does provide a set of links to previous posts, but this is very rudimentary and not that easy to navigate for the user.  I usually format the blog to place this default set of links at the bottom of each page.

For the header to a simple layout blog, I start with a blank image template correctly sized and ready to add some text headings and images:


I use a screen capture utility to get images of the default blog heading and my own brief heading description:


I then use the free GIMP image manipulation software to combine these images and add any other images I want in the heading banner:


Once this header image is complete, I go into Blogger in the Layout area under Header and configure the Header as follows:

 The image is uploaded and the Blog Description is replaced with the following code that provides a link to the Index of Past Posts:

You can access a text file containing this code:


The JPEG image in the HTML code is this one:


And the Blog Heading is complete:


Image Maps - Making Clickable Images

It is often a help to navigation to present information as an image with different areas that can be clicked on to carry the reader to different pages. On the index page my Google Treking Blog I set up a clickable map of the world that gives a brief trek description when the mouse hovers over a number and will take you to that trek if you click on a number:


WikiHow presents an excellent step by step procedure for creating an clickable image map using the free GIMP image manipulation software:


For my image map I took the map from My Google Trek Blog Index of Past Posts and opened it in GIMP using the Image Map Editor under the FILTERS heading:


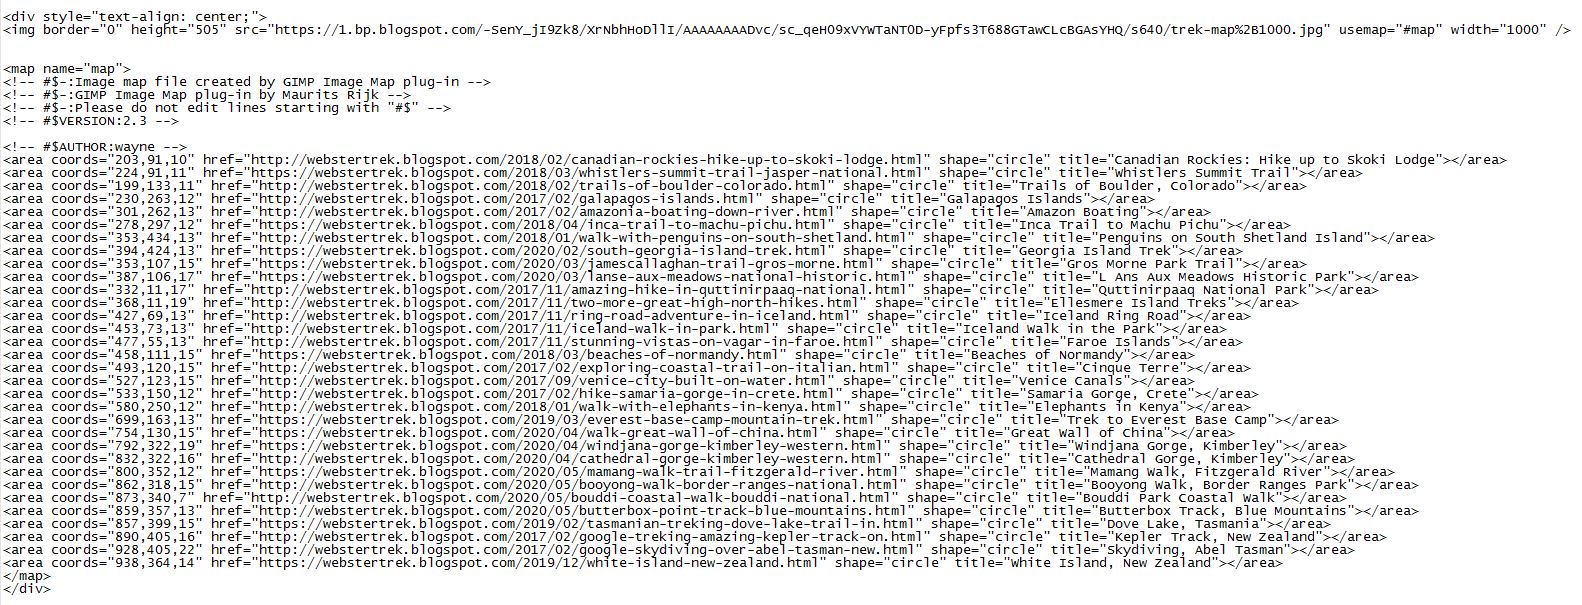
I selected the circle shape for my clickable areas of the map, and then created an area and link for every number on the map.  When completed, I went to the VIEW area, selected "View Source" and then cut the code out and pasted it into my Google Treking Index of Past Posts to replace the previous map.  Here is text file containing the HTML code that I cut and pasted:


After the map code was pasted into the post, I noticed that there were no titles used.  Titles appear when the mouse hovers over a number.  So I added a brief title to each of the map areas of this code as you can see above. 

NOTE:  The image map should be saved in GIMP as a .map file.  When further numbers or other changes are made to the map, the image mapper filter can be accessed to open the .map file which is then applied to the altered map and other clickable areas can be added.


Monday, June 8, 2020

Blog Home - Using Tables in a Blog Post


 Life in Books   
  
Movie Mosaics 


Sometimes a table is the best structure for a set of elements as above where a 3 column, 5 row table is used to display a set of blogs and their banners which can be clicked to access each of these blogs.  

You can start by assembling the elements for the table into the post, one after the other.  In this case I used the Blogger image feature to display the blog banners, and I altered the "aref" address for each image to the actual blog address so that each image is itself clickable.

Next, you need a table, which Blogger will not construct for you.  We started the above table as a 3x4 table generated using the Table Wizard of the free Arachnophilia HTML editor, and then the generated table is cut and pasted into this post using the HTML mode. 

After the cut and paste you can stay in HTML mode and proceed to cut and paste elements into the table, substituting them for the place savers shown below where R is for Row and C is for Column:

R1C1 R1C2 R1C3
R2C1 R2C2 R2C3
R3C1 R3C2 R3C3
R4C1 R4C2 R4C3 


The simple html code for this 3x4 table is available below in a text file from which it can be cut and pasted into a blog post:

Table HTML in a Text File
 
  This table code has been pared down to its basics so that the pattern of <td> and <tr> html tags is clear and can be easily expanded into any size table.  TR stands for Table Row, and TD stands for Table Data which are essentially in table columns.

There are many free open source HTML editors that make it simple to construct HTML elements and then cut and paste them into a post.

Though many helpful libraries exist to standardize and simplify the web development process, coding for the web isn't being displaced any time soon. Proprietary tools are still common, but there is a rich collection of open source alternatives out there. Here are some you should consider:

 Seven Open Source HTML/CSS editors